Ethernet Cable Colors
Ethernet Cable Colors: Color Code Standards
The information listed here is
to assist Network
Administrators
in the color coding of Ethernet
cables. Please
be aware
that modifying Ethernet cables improperly may cause
loss of network connectivity. Use this information at
your own
risk, and ensure all connectors and cables
are modified in accordance
with TIA standards.
Basic Theory:By looking at a T-568A UTP Ethernet straight-thru
cable and an Ethernet crossover cable with a T-568B
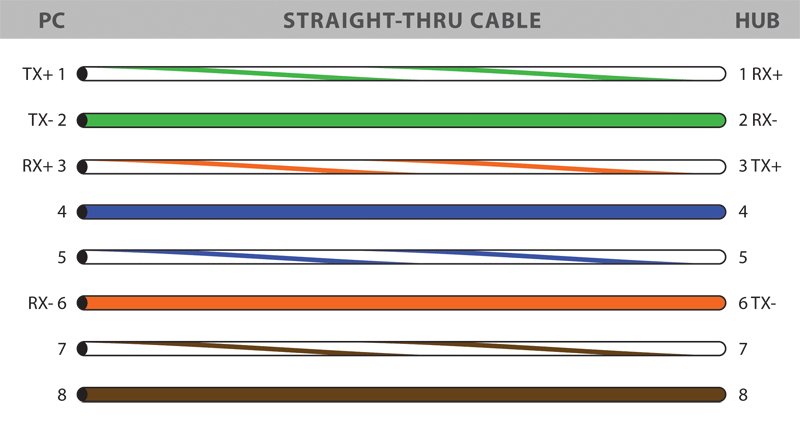
connected to the corresponding RX (receiver) pins,
plus to plus and minus to minus. You can also see that
both the blue and brown wire pairs on pins 4, 5, 7, and 8
are not used in either standard. What you may not realize
is that, these same pins 4, 5, 7, and 8 are not used or required
in 100BASE-TX as well. So why bother using these wires,
well for one thing its simply easier to make a connection with
all the wires grouped together. Otherwise you'll be spending
time trying to fit those tiny little wires into each of the corresponding
holes in the RJ-45 connector.
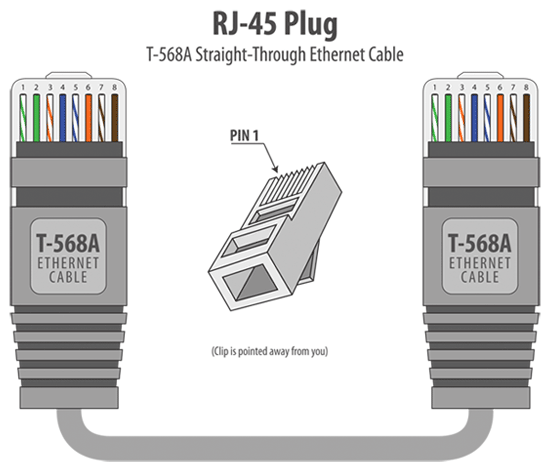
T-568A Straight-Through Ethernet Cable
Cat5e Cables | Cat6 Cables
The T-568A standard is supposed
to be used in new network
installations. Most off-the-shelf Ethernet cables are still of the T-568B standard; however, it makes absolutely no functional difference in which you choose.
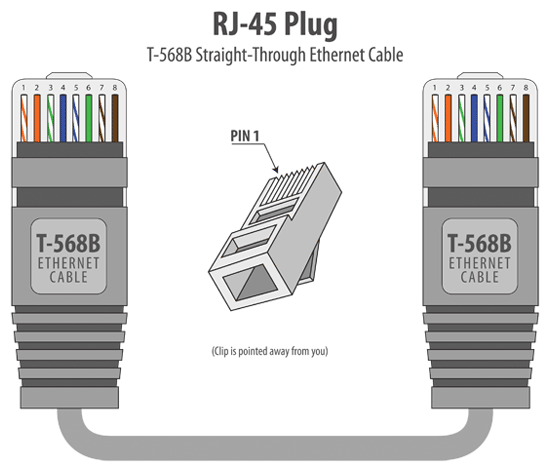
T-568B Straight-Through Ethernet Cableinstallations. Most off-the-shelf Ethernet cables are still of the T-568B standard; however, it makes absolutely no functional difference in which you choose.
Cat5e Cables | Cat6 Cables
Both the T-568A and the T-568B standard Straight-Through
cables are used most often as patch cords for your Ethernet connections.
If you require a cable to connect two Ethernet devices directly
together without a hub or when you connect two hubs together,
you will need to use a Crossover cable instead.
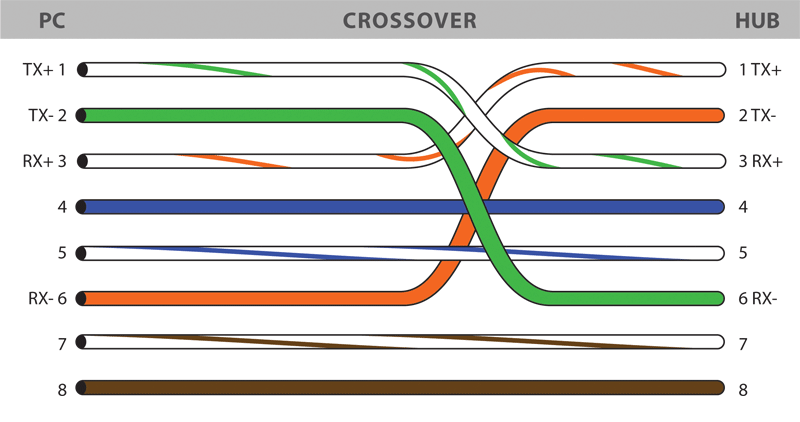
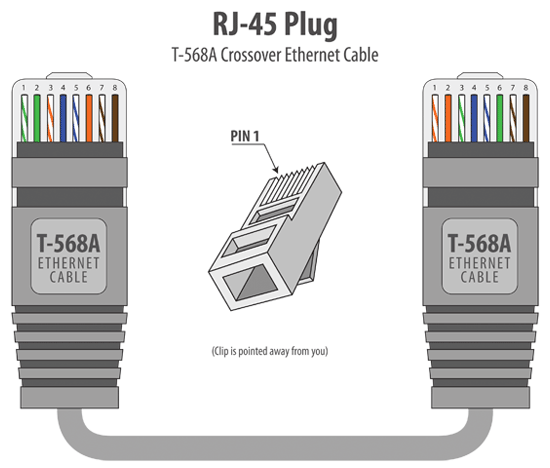
RJ-45 Crossover Ethernet CableCat5e Crossover Cables | Cat6 Crossover Cables
A good way of remembering how to wire a Crossover
Ethernet cable is to wire one end using the T-568A standard and
the other end using the T-568B standard. Another way of remembering
the color coding is to simply switch the Green set of wires in
place with the Orange set of wires. Specifically, switch the
solid Green (G) with the solid Orange, and switch the green/white
with the orange/white.
How to Build an Ethernet Cable Instructions:- Pull the cable off the reel to the desired length and cut using wire cutters or scissors. If you are pulling cables through holes, it's easier to attach the RJ-45 plugs after the cable is pulled. The total length of wire segments between a PC and a switch or between two PC's cannot exceed 100 Meters (328 feet) for 100BASE-TX and 300 Meters for 10BASE-T.
- Start on one end and strip the cable jacket off (about 1") using a wire stripper or a knife. Be extra careful not to nick the wires, otherwise you will need to start over.
- Spread, untwist the pairs, and arrange the wires in the order of the desired cable end. Flatten the end between your thumb and forefinger. Trim the ends of the wires so they are even with one another, leaving only 1/2" in wire length. If it is longer than 1/2" it will be out-of-spec and susceptible to crosstalk. Flatten and insure there are no spaces between wires.
- Hold the RJ-45 plug with the clip facing down or away from you. Push the wires firmly into the plug. Inspect each wire is flat even at the front of the plug. Check the order of the wires. Double check again. Check that the jacket is fitted right against the stop of the plug. Carefully hold the wire and firmly crimp the RJ-45 with the crimp tool.
- Check the color orientation, check that the crimped connection is not about to come apart, and check to see if the wires are flat against the front of the plug. If even one of these are incorrect, you will have to start over. Test the Ethernet cable.
> Defective Hard disk:
Following items can indicate a defective harddisk:
- The harddisk makes ticking sounds.
- The harddisk makes a weird tune (serious !).
- The harddisk makes a shrieking or rattling noise.
- The harddisk smells burnt; some parts can even smoke.
- The harddisk is not recognised any more by the bios or windows / OSC / Linux / Etc...
- Windows / OS X / Linux / Etc... cannot boot anymore.
- The computer stops reacting while you are at work.
- Your harddisk suddenly seems to have an incredible capacity (e.g. 0 GB of 10000 GB).
- Your harddisk still appears in the bios but its normal name has changed.
Common symptoms of bad ram:
There are many indicators of bad memory, but the most common ones are:
Explanation:
The system is exhibiting behavior that implies that the CMOS battery is dead. This can include lost CMOS settings, the real-time clock losing time, or of course dead battery warnings at boot time.
Diagnosis:
On an older PC, it is normal for the CMOS battery to fail at some point in time. They usually last for many years, with over five years being the norm, at least on older machines. Nobody knows for sure how newer machines will fare. On a new motherboard, this sort of message is a sign of a defect, although you shouldn't worry about it if it appears only the very first time the board is powered up. The solution is replacing the battery, and this can be an either easy or impossible task, depending on how much thought the motherboard manufacturer put into the design.
- Computer not booting at all, beeping endlessly. When this happens all you can do is replace the RAM by trying another stick. You wont be able to use any ram diagnostic software in this instance.
- Distorted graphics on the screen. However it is possible this can be video card related.
- Blue screens of death during the installation of Windows XP or Windows 2000. This is an obvious sign of faulty RAM.
- Crashes or blue screens during normal operation of the system (emails, web surfing etc.)
- Crashes during memory intensive tasks such as using Photoshop, playing 3d games etc..
The CMOS battery is dead or dying:
The system is exhibiting behavior that implies that the CMOS battery is dead. This can include lost CMOS settings, the real-time clock losing time, or of course dead battery warnings at boot time.
Diagnosis:
On an older PC, it is normal for the CMOS battery to fail at some point in time. They usually last for many years, with over five years being the norm, at least on older machines. Nobody knows for sure how newer machines will fare. On a new motherboard, this sort of message is a sign of a defect, although you shouldn't worry about it if it appears only the very first time the board is powered up. The solution is replacing the battery, and this can be an either easy or impossible task, depending on how much thought the motherboard manufacturer put into the design.
is a system, consisting of many components. *Computer Hardware Installation
Some of those components, like Windows XP, and all >By pass or remove the BIOS Password
your other programs, are software. > Defective Memory (RAM)
The stuff you can actually see and touch, and would > Defective Hard disk
likely break if you threw it out a fifth-story window, > Defective CMOS Battery
is hardware. >
Not everybody has exactly the same hardware. But Some of those components, like Windows XP, and all >By pass or remove the BIOS Password
your other programs, are software. > Defective Memory (RAM)
The stuff you can actually see and touch, and would > Defective Hard disk
likely break if you threw it out a fifth-story window, > Defective CMOS Battery
is hardware. >
those of you, who have a desktop system, , probably
have most of the components shown in that same
figure. Those notebook computers probably have most
of the same components. Only in this case the
components are all integrated into a single book-sized
portable unit.
The system unit
Is the actual computer; everything else is
called a peripheral device. Your computer's system
unit probably has at least one floppy disk drive,
but probably in this present generation no more
hard disk exist so now the CD or DVD drive, into
which you can insert CD or DVD Tape. There's
another disk drive, called the hard disk inside
the system unit. You can't remove that disk, or
even see it because it will be damaged. But it's
there. And everything that's currently "in the
computer" is actually stored on that hard disk.
The floppy drive and CD drive
Are often referred to as drives with removable media or removable drives for short, because you can remove whatever disk is currently in the drive, and replace it with another. Your computer's hard disk can store as much information as tens of thousands of floppy disks, so don't worry about
running out of space on your hard disk any time soon. As a rule, you want to store everything you create or download on your hard disk. Use the floppy disks and CDs to send copies of files through the mail, or to make backup copies of important items.
Random Access Memory (RAM)
There's too much "stuff" on your computer's hard disk to use it all at the same time. During the average session sitting at the computer, you'll probably use only a small amount of all that's available. The stuff you're working with at any given moment is stored in random access memory (often abbreviated RAM, and often called simply "memory"). The advantage using RAM to store whatever you're working on at the moment is that RAM is very fast. It is faster than any disk. But remember, a memory restored temporarily only.
So if RAM is so fast, why not put everything in it? Why has a hard disk at all? The answer to that lies in the fact that RAM is volatile. As soon as the computer is shut off, whether intentionally or by an accidental power outage, every thing in RAM disappears, the memory is empty again. Just quickly as a light bulb goes out when the plug is pulled. So you don't want to rely on RAM to hold everything. A disk, on the other hand, holds its information whether the power is on or off.
UPDATES
Try our toolbar
Email Marketing You Can Trust
http://www.vipreantivirus.com/VIPRE-Antivirus/Definitions/
UPDATE YOUR SUNBELT VIPRE ANTI - VIRUS
any version
click to download
NEW FOLDER LOCK v. 7.0.2/0.6 PASSWORD:
Serial Key: F7-20110917-9-172951
Registration: 526EFEF086E09600449E667EA2DAE8E2E6D642BC
How to block the internet websites by using AVAST ANTI VIRUS:
http://www.vipreantivirus.com/VIPRE-Antivirus/Definitions/
UPDATE YOUR SUNBELT VIPRE ANTI - VIRUS
any version
click to download
NEW FOLDER LOCK v. 7.0.2/0.6 PASSWORD:
Serial Key: F7-20110917-9-172951
Registration: 526EFEF086E09600449E667EA2DAE8E2E6D642BC
Instruction:
1. If you have Antivirus
like avast, you can easily block the Internet (any websites you want to block).
All you have to do is:
2. Click the Avast Icon
place in the desktop, all programs or in a taskbar.
3. If it’s already open, click
"sitting" above.
4. First click the
password, then you can put password, but remember if the you forget the
password.You can never change it. The only way to change is your going to
format the OS.
5. After you put the password,
go to the “ADDITIONAL PROTECTION"
Then click "SITE BLOCKING”,
check "ENABLE SITE BLOCKING" enter the "URL". For example.,www.facebook.com.
6. Finish, the website is
already blocking.
How to View a Hidden Partition on Windows XP

A partition is sometimes used to store passwords and important files on a computer. You can also create more space with another partition on your computer. If you have a hidden partition, Windows XP hides it as default. You can unhidden the partition so you will be able to see it on the My Computer or Windows Explorer screens.
Instructions
1. Click "Start" and
"Control Panel."
2.
Click "Folder
Options." Click the "View" tab and under the "Advanced
Settings" section find "Hidden Files" and "Folder."
Choose "Show hidden files and folders." Unchecked "Hide protected
operating system files (Recommended.)"
3.
Click "Start" and
"My Computer." The partition will now be visible on this screen.
How to Make My Documents Private on Windows XP
There are any numbers of reasons why
you may wish to make a folder private in Windows XP. You could be on a shared
computer without a requirement for a network log in, you may be storing files
containing personal or confidential information that you want to keep safe from
prying eyes, or you may simply not want other people modifying vital system
operation files. Whatever the case, making the My Documents folder private,
like securing any other folder, is simply a matter of setting it to be so in
the folder's properties.
Instructions
- 1
Double-click
the C drive in "My Computer."
- 2
Open the
"Documents and Settings" folder.
- 3
Right-click
on the folder that corresponds to your user name. Select "Properties"
from the sub-menu.
- 4
Click on
the "Sharing" tab. You will see a check box that reads, "Make
this folder private so that only I have access to it." Click on the check
box. Your My Documents folder is now secure, allowing only you to have access
to it when logged in to your window.
Subscribe to:
Posts (Atom)